There’s a rumor going around that Pinterest is dead. But with close to half a billion active monthly users, that’s hard to believe.
Pinterest is a visual discovery platform where users curate and share inspirational content through ‘pins’ while exploring a wide range of ideas from creators worldwide.
Most Pinterest users are highly engaged, with recent statistics showing that together, they bookmark a whopping 1.5 billion pins per week. Plus, they don’t just passively scroll through their feeds, either. Many Pinterest users utilize the social platform actively to solve problems, find inspiration, and plan projects.
All of this adds up to Pinterest being a great tool for increasing your blog’s visibility, driving traffic to your website, and engaging with motivated users. My own research and experience of running websites confirms this.
In this article, I’ll show you how to use Pinterest to massively boost your blog traffic.
Note: This is a guest post by Steve Wells, the co-founder of Strategy11, the company behind Formidable Forms and WP Tasty. This is an expert column that we publish, where we invite a WordPress expert to share their experiences with our readers.

Here’s a list of the topics I’ll cover in this article. Just use the links below to jump to the section you’re most interested in:
1. Create and Optimize a Pinterest Business Profile
If you want to promote your blog content on Pinterest, then the first thing you will need to do is create an account and optimize your Pinterest profile so that it’s visible and discoverable.
Create a Pinterest Business Account
When signing up, make sure you sign up for a free Pinterest Business Account.
This will give you the features you need, like rich pins and analytics. A business account will also give you the option to make your content more visible using paid ads and promoted pins.


If you already have a personal Pinterest account, then you can easily convert it to a business account using the ‘Convert to business’ option from the drop-down menu in the right corner of your Pinterest profile.
Optimize Your Pinterest Business Profile
Next, you need to optimize your Pinterest profile to make it easier to discover. Make sure you add a suitable profile name and a short description that lets Pinterest users know about your blog.
And make sure you use a professional profile picture and header image. For brand consistency, it’s normally best to use your business logo as your profile picture.
Claim Your Website
Finally, you need to claim your website. This shows that you are the owner of your blog, which gives you more credibility and boosts your content’s visibility.
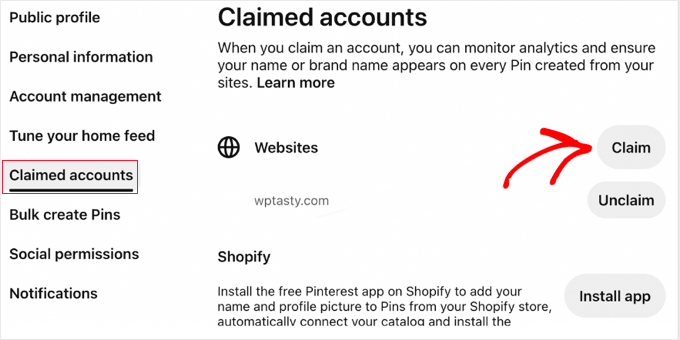

This will let you see how often your content is shared on Pinterest. It also shows people where to find more information about you since your Pinterest profile will be linked to any pins that share content from your site.
For more information, just see this guide on how to verify your WordPress site on Pinterest.
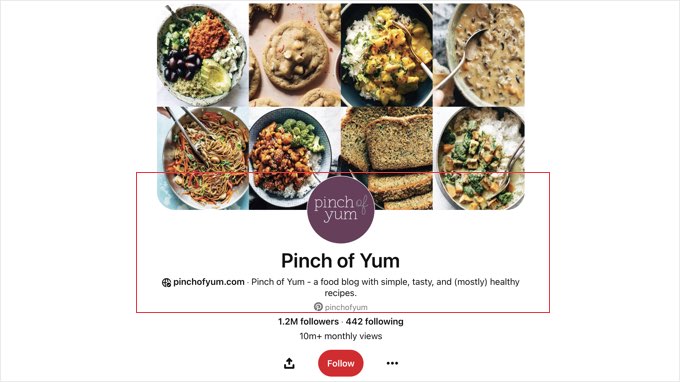
Here’s the Pinterest business profile of one of my clients who gets a lot of traffic from Pinterest.
Their profile picture, header image, and name are on brand and they show a clear and simple description of their blog. Plus, under that, you can also see that they have claimed their website.

2. Create Attention-Grabbing Pins on Pinterest
Now that you’ve created a Pinterest Business account and profile page, you can start to add content that promotes your blog on Pinterest.
Create Pinterest Boards to Mirror Your Blog’s Main Categories
First, you need to create some Pinterest boards to store your content. You can think of these as corkboards that you pin things to.
I recommend you create a board for each of your main blog categories. This will make it easy to know which board to choose when pinning your posts.
Then, make sure you give them catchy names and use an eye-catching image.
Create Pins With High-Quality Images
Pins are visual bookmarks on Pinterest, like pinning an interesting magazine clipping onto a pinboard. As a blogger or website owner, they are bite-sized pieces of content that link back to your blog posts.
Remember that Pinterest is a very visual platform, so your pins will need to feature high-quality, attention-grabbing images that stand out. Aim for professional, bright, and visually appealing photos or graphics that match your blog’s brand or niche.
You can generate images using AI or image editing software such as Canva or one of its alternatives. You will need to use imaging editing software if you’d like to overlay text.
Pinterest will automatically scale your images to fit their grid. I find that vertical images with a 2:3 aspect ratio perform best, and JPG images less than 20 MB in size are recommended.
Tip: See this WPBeginner cheat sheet of image sizes and aspect ratios for Pinterest and other social platforms.
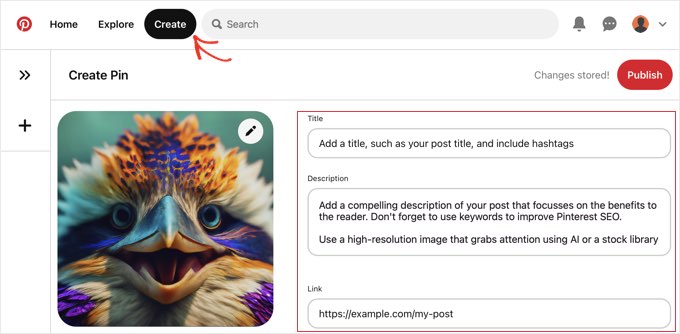

Next, you need to add a title, description, and link. You can use the title and meta description from your post or customize them for Pinterest. Make sure you highlight the blog post’s topic or a key benefit of reading it.
In the next section, I’ll share my favorite tips on how you can optimize your pins for Pinterest SEO to make them more discoverable.
Use Rich Pins to Automatically Pull Metadata From Your Blog Posts
You can save time creating content on Pinterest by using rich pins for articles, recipes, and products. These automatically pull metadata straight from a website URL.
Rich pins help your content stand out and get noticed. The extra metadata can encourage users to visit your website, boosting your traffic.
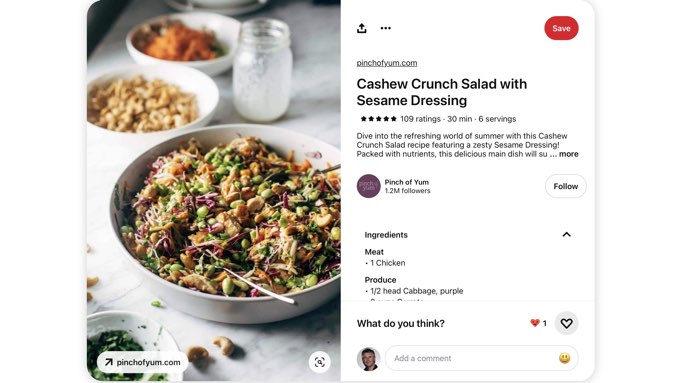
For example, here’s a recipe rich pin from my client, Pinch of Yum. When you hover your mouse over the image, you will see a button that takes you straight to the recipe on their website.

To use this Pinterest feature, you need to add Open Graph metadata to your website so that Pinterest and other social media websites can get information about your WordPress posts.
This can become quite technical, so I suggest using All in One SEO, a popular WordPress SEO plugin that can enable Open Graph markup with a simple setting.
Or if you have a cooking blog, then you can also use the Tasty Recipes plugin on your website to easily create recipe rich pins.
3. Optimize Your Pins and Boards for Pinterest SEO
Remember that Pinterest is part social media platform and part search engine. That means it’s important to consider Pinterest SEO when creating your pins.
Optimizing your pins for Pinterest search is very similar to optimizing your posts for search engines like Google. The goal is for your pins to appear near the top of the results when users search Pinterest using related keywords.
Here are my top tips:
- You’ve already done lots of keyword research when planning your blog content. You can use these same keywords to optimize your pins and boards on Pinterest. Make sure you include those keywords in your pin titles and descriptions.
- On Pinterest, I strongly recommend including your primary keywords in the first sentence or two of your pin description. Pinterest considers this for search rankings.
- Better still, use 2-5 relevant hashtags in your pin descriptions. Pinterest hashtags act like keywords and can improve the ranking of your pins. They’re also used when Pinterest decides which content to recommend to users interested in similar topics.
Would you like to see more hints on creating high-ranking pins? I asked my team to put together a post listing the most helpful Pinterest SEO traffic secrets.
4. Consistently Pin and Engage With the Pinterest Community
Boosting traffic with Pinterest is a marathon, not a sprint. It will take patience and consistent effort to see results.
I carefully studied Pinterest traffic to several blogs over a number of years. In my experience, you can expect it to take 6 months or more before you see results.
This means you will need to regularly create high-quality, engaging content on Pinterest and take time to engage with interested users on Pinterest.
Regularly Promote Your Blog Posts on Pinterest
I’m often asked about the ideal frequency of posting on Pinterest. Well, there’s no magic number, but I find that aiming for 5-10 pins per day is a great starting point for maintaining visibility.
This can include links to your own content and re-pinning relevant pins by other users. Make sure you spread the pins out throughout the day, and I don’t recommend pinning the same blog post more than once a week or it can look spammy.
Now, 5-10 pins per day sounds like a lot of work, so many of my clients use tools like Tailwind, an online tool that lets them create pins in batches and schedule them in advance.
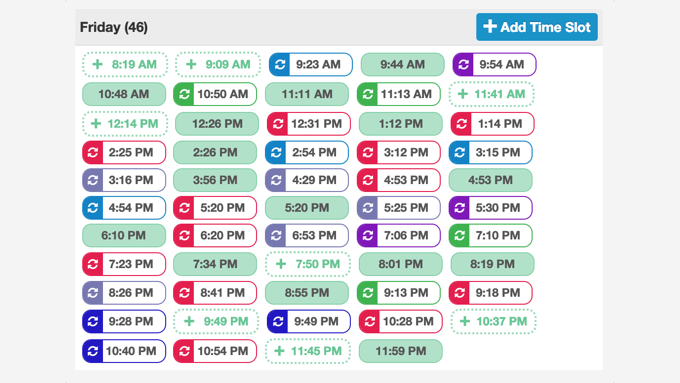

You can also use the Tasty Pins plugin to pin your content straight from your blog.
Like and Comment on Relevant Content From Other Users
You should also regularly engage with Pinterest users who have an interest in your blog’s topic.
These users may be commenting on your pins, so be sure to respond by thanking them for their comments and answering their questions.
You can also find like-minded Pinterest users by searching for pins using the same keywords and tags as yours and then engage with them by liking and commenting on their pins.


Building relationships with these users may encourage them to check out your profile and potentially your blog.
Like retweeting on X (Twitter), you can also repin content from other users when you feel it aligns with your brand and resonates with your followers.
This can build trust and establish you as a credible source of information because you’re not just promoting your own blog or pushing your own agenda.
Participate in Group Boards Relevant to Your Blog Content
Another way to establish yourself as an authority and collaborate with other Pinterest users is by joining or creating group boards around your blog’s niche.
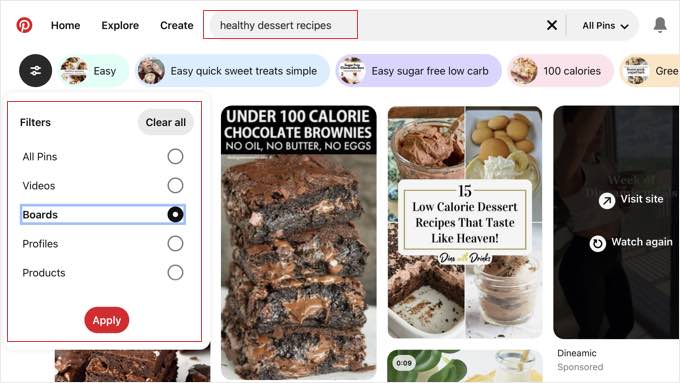

These are shared spaces on Pinterest that can expose your pins to a wider audience interested in the topic. More users seeing your pins means more traffic to your blog.
5. Make Your Blog Content Pinnable to Encourage Sharing
The good news is that you don’t need to do all of the work promoting your blog on Pinterest. To get the maximum exposure, you need to make it easy for your readers to pin your content, too.
The best way to do that is to display a Pinterest button on your images. These appear automatically when you hover your mouse over an image.
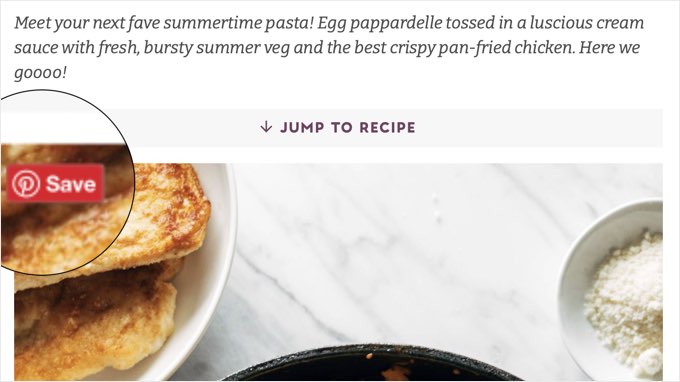

Pinterest hover buttons drastically simplify the task of pinning your content. Users simply click the button and then choose which board to pin the post to.
You can create these buttons by adding code to your website. However, in my experience, most users find it easier to use a plugin like Tasty Pins.
The plugin doesn’t just add a Pinterest button to each image on your website. It also displays a follow box that invites your website visitors to follow you on Pinterest.
Besides that, Tasty Pins lets you customize the title, description, and style of each pin right from the WordPress editor and use image dimensions that work best with Pinterest.
For more options, you can see the WPBeginner guide on how to add a Pinterest “Pin It” button in WordPress.
6. Track Your Success Using Pinterest’s Analytics Dashboard
You can’t improve what you don’t measure.
Luckily, it’s easy for business users to access Pinterest analytics to track their performance and identify what’s working and what’s not. This will let you adjust your strategy over time to optimize your pins for maximum traffic.
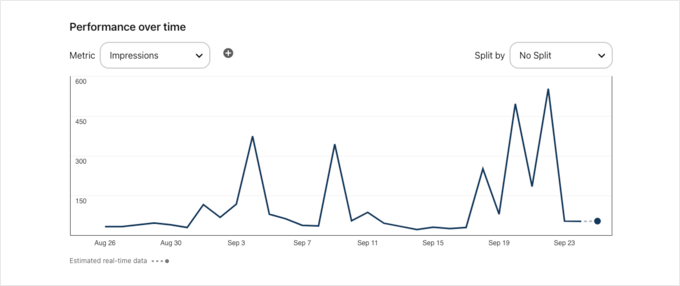

By carefully studying your Pinterest analytics, you can discover the pins that get the most impressions and clicks and the optimal time of day for maximum pin engagement.
You can then use these insights to boost your blog traffic from Pinterest. For example, if your most successful pins are about a certain topic or niche, then you can focus on creating posts and pins on the same topic.
I hope this post got you thinking about using Pinterest to drive more traffic to your WordPress blog. You may also want to see these guides on how to double your SEO traffic in 6 months and the best WordPress plugins to quickly help you get more traffic.
If you liked this article, then please subscribe to our YouTube Channel for WordPress video tutorials. You can also find us on Twitter and Facebook.
[ad_2]
